便携式多节点集群
Note: These instructions are somewhat significantly more advanced than the single node instructions. If you are interested in just starting to explore Kubernetes, we recommend that you start there.
Prerequisites
The only thing you need is a machine with Docker 1.7.1 or higher
Overview
This guide will set up a 2-node Kubernetes cluster, consisting of a master node which hosts the API server and orchestrates work and a worker node which receives work from the master. You can repeat the process of adding worker nodes an arbitrary number of times to create larger clusters.
Here’s a diagram of what the final result will look like:
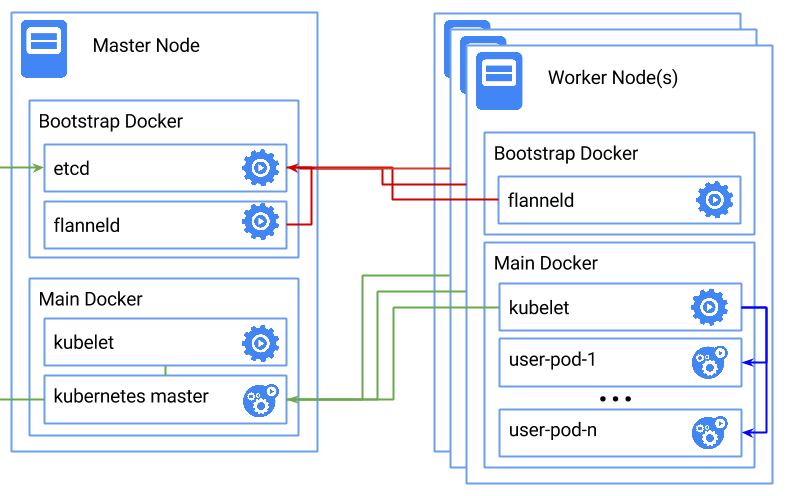
Bootstrap Docker
This guide also uses a pattern of running two instances of the Docker daemon
1) A bootstrap Docker instance which is used to start system daemons like flanneld and etcd
2) A main Docker instance which is used for the Kubernetes infrastructure and user’s scheduled containers
This pattern is necessary because the flannel daemon is responsible for setting up and managing the network that interconnects
all of the Docker containers created by Kubernetes. To achieve this, it must run outside of the main Docker daemon. However,
it is still useful to use containers for deployment and management, so we create a simpler bootstrap daemon to achieve this.
You can specify the version on every node before install:
export K8S_VERSION=<your_k8s_version (e.g. 1.2.0)>
export ETCD_VERSION=<your_etcd_version (e.g. 2.2.1)>
export FLANNEL_VERSION=<your_flannel_version (e.g. 0.5.5)>
export FLANNEL_IFACE=<flannel_interface (defaults to eth0)>
export FLANNEL_IPMASQ=<flannel_ipmasq_flag (defaults to true)>
Otherwise, we’ll use latest hyperkube image as default k8s version.
Master Node
The first step in the process is to initialize the master node.
The MASTER_IP step here is optional, it defaults to the first value of hostname -I.
Clone the Kubernetes repo, and run master.sh on the master machine with root:
$ export MASTER_IP=<your_master_ip (e.g. 1.2.3.4)>
$ cd kubernetes/docs/getting-started-guides/docker-multinode/
$ ./master.sh
Master done!
See here for detailed instructions explanation.
Adding a worker node
Once your master is up and running you can add one or more workers on different machines.
Clone the Kubernetes repo, and run worker.sh on the worker machine with root:
$ export MASTER_IP=<your_master_ip (e.g. 1.2.3.4)>
$ cd kubernetes/docs/getting-started-guides/docker-multinode/
$ ./worker.sh
Worker done!
See here for a detailed explanation.
Deploy a DNS
See here for instructions.
Testing your cluster
Once your cluster has been created you can test it out
For more complete applications, please look in the examples directory
支持级别
| IaaS Provider | Config. Mgmt | OS | Networking | Docs | Conforms | Support Level |
|---|---|---|---|---|---|---|
| Docker Multi Node | custom | N/A | flannel | docs | Project (@brendandburns) |
For support level information on all solutions, see the Table of solutions chart.